Table of contents
- Overview
- Authentication flow
- Authenticating incoming REST API calls
- Authenticating users
- OIDC Configuration
- User provisioning
- OIDC Servers
Overview
OpenPaaS supports OpenID Connect (OIDC) as Authentication/Authorization module. OIDC can be used to authenticate users when they reach OpenPaaS ESN and when they launch an OpenPaaS powered application: User is redirected to the OIDC login page, authenticates, and is then redirected to the initial application.
The current page describes how to configure and use OIDC to provide this Single Sign On (SSO) support in OpenPaaS.
Authentication flow
We have three parties:
- the web application, running in the browser
- the API server
- the OIDC server
The flow goes as follows:
- the user agent hits the web application
- the web application checks its connection status, then redirect to the OIDC server authorization_endpoint
- the user logs in
- the OIDC server redirects to the web application, using a specific hash in the URL
#/auth/oidc/callback - the web application is now connected and has a bearer token
- the web application issues a request to the API server. It adds a header
Authorization: bearer [bearer token provided by the OIDC server] - the API server issues a connection to the OIDC server, using the bearer token, to get the user informations
- the API server now knows the identity of the user, and proceeds to the query
Authenticating incoming REST API calls
In order to allow applications to call OpenPaaS APIs, the OIDC strategy must be enabled on the OpenPaaS ESN backend. The current section explains how to configure it.
API Configuration
The openid-connect strategy must be added to the list of API strategies in the config/default.*.json file:
"auth": {
  "apiStrategies": ["basic-mongo-ldap", "basic-mongo", "openid-connect", "bearer", "jwt"]
}
This strategy will:
- Get the
Bearertoken from the incoming HTTP request - Try to authenticate user from the token
- Try to retrieve the user from the token by requesting the OIDC server
- “Mount” the OpenPaaS user from retrieved OIDC user email
- Pass the request to the next handler
In order to retrieve the user from the token by requesting the OIDC server, OpenPaaS needs to be configured correctly: Configuration is described in the OIDC Configuration below.
Authenticating users
OIDC can also be used for SSO at the OpenPaaS portal level. The OpenPaaS Web application acts as an OIDC Relying Party (commonly called ‘client’): The user will be redirected to the OIDC login page when required.
Configuration
- On the OIDC provider side, a client must be created. In this howto we use
openpaas-esnvalue asclient_id. - The OpenPaaS configuration must be updated to include the
openpaas-esnclient as described in theOIDC Configurationsection below.
Required fields for the configuration are:
client_id:openpaas-esnin this exampleclient_secretis the unique, generated secret provided by the OIDC serverissuer_urlis the Issuer URL of your OIDC server. If defined, it overrides the one defined at the top level. It is frequently the URL of the auth server, likehttps://auth.openpaas.exampleauthorization_urlis the authorization endpointtoken_urlis the token endpointuser_info_urlis the token to fetch user informationend_session_endpointis the URL used to end the user session (Spec)
OIDC Configuration
The configuration is platform-wide and so has to be set in the core module in the openid-connect settings:
{
  "name": "core",
  "configurations": [
    {
      "name": "openid-connect",
      "value": {
        "issuer_url": "http://localhost:8888/auth/realms/master",
        "clients": [
          {
            "client_id": "an-openpaas-client",
            "client_secret": "34b398b7-79fe-4ab1-b53c-b68c20743558",
            "issuer_url": "http://issuer:8888/auth/realms/master"
          },
          {
            "client_id": "openpaas-esn",
            "client_secret": "34b398b7-79fe-4ab1-b53c-b68c20743559",
            "issuer_url": "http://issuer:8888/auth/realms/master",
            "authorization_url": "http://issuer:8888/auth/realms/master/protocol/openid-connect/auth",
            "token_url": "http://issuer:8888/auth/realms/master/protocol/openid-connect/token",
            "user_info_url": "http://issuer:8888/auth/realms/master/protocol/openid-connect/userinfo",
            "end_session_endpoint": "http://issuer:8888/auth/realms/master/protocol/openid-connect/logout"
          }
        ]
      }
    },
    // ...
  ]
}
Where:
issuer_urlis the Issuer URL of your OIDC server. This value will be used if none is defined in the client item from theclientsarray below.clientsis an array of OIDC clients (Relying Party) where:client_idis the ID of the client you configured in the OIDC serverclient_secretis the unique, generated secret provided by the OIDC serverissuer_urlis the Issuer URL of your OIDC server. If defined, it overrides the one defined at the top level.authorization_urlis the authorization endpoint. Required forlinagora.esn.oidcmodule.token_urlis the token endpoint. Required forlinagora.esn.oidcmodule.user_info_urlis the token to fetch user information. Required forlinagora.esn.oidcmodule.end_session_endpointis the URL used to end the user session (Spec).
Lots of OIDC servers implement the “Well Known” URL. It’s something like https://auth.openpaas.example/.well-known/openid-configuration.
| OpenPaaS configuration | OIDC server well known JSON key |
|---|---|
| issuer_url | issuer |
| authorization_url | authorization_endpoint |
| token_url | token_endpoint |
| user_info_url | userinfo_endpoint |
| end_session_endpoint | end_session_endpoint |
These values are available on distinct locations based on the OIDC server you use. More details are given below.
Until there is an UI to configure it, the only ways to set these values are:
- Update the document in the MOngoDB
configurationscollection -
Call the configuration REST API with a platform administrator credentials such as:
curl -d "@configuration.json" -H "Content-Type: application/json" --user admin@open-paas.org:secret -X PUT http://localhost:8080/api/configurations\?scope\=platformWhere
configuration.jsonis a file which contains the configuration you want to set such as:[ { "name": "core", "configurations": [ { "name": "openid-connect", "value": { "issuer_url": "http://localhost:8888/auth/realms/master", "clients": [ { "client_id": "openpaas", "client_secret": "2ec1a41d-b008-444c-a867-fa9985f7183b" }, { "client_id": "openpaas-esn", "client_secret": "34b398b7-79fe-4ab1-b53c-b68c20743559", "issuer_url": "http://issuer:8888/auth/realms/master", "authorization_url": "http://issuer:8888/auth/realms/master/protocol/openid-connect/auth", "token_url": "http://issuer:8888/auth/realms/master/protocol/openid-connect/token", "user_info_url": "http://issuer:8888/auth/realms/master/protocol/openid-connect/userinfo", "end_session_endpoint": "http://issuer:8888/auth/realms/master/protocol/openid-connect/logout" } ] } } ] } ]
User provisioning
When delegating authentication to OIDC, the users will be provisioned in the OpenPaaS backend when required:
- When OpenPaaS ESN is loading user at login
- When OpenPaaS application is calling REST APIs
In order to provision the user in the right domain, OpenPaaS will rely on the email address provided by the OIDC UserInfo endpoint and provision following these steps:
- Extracting the email Top-Level Domain (TLD)
- Searching a domain with the name from email address TLD
- If domain found then create a user in this domain
- Else do not provision user
For example, if the user email address is name@open-paas.org, search a domain with name open-paas.org then create user in this domain if it exists, else fail.
OIDC Servers
The current section will give details on how to use and configure OIDC self-hosted servers as part of a development process. This is not supposed to be used as-is in production environments.
Keycloak
Keycloak is an Open Source Identity and Access Management which can be used as OIDC server.
In the following instructions, it is assumed that Keycloak has is running on port 8888 and that we are using the master realm i.e.
docker run -p 8888:8080 jboss/keycloak
The easiest way to go is to use Docker as described in the Docker Hub page.
Once logged in as admin, you should have access to the realm configuration page on http://localhost:8888/auth/admin/master/console/#/realms/master.
In order to use OpenID Connect in OpenPaaS, you will have to create a Client in keycloak:
- Go to
Clients, then click onCreate. - Set
openpaasasClient ID - Toggle
Consent RequiredtoON - Toggle
Display client on consent screentoON - Toggle
Implicit Flow EnabledtoON - Set
AccessType toconfidential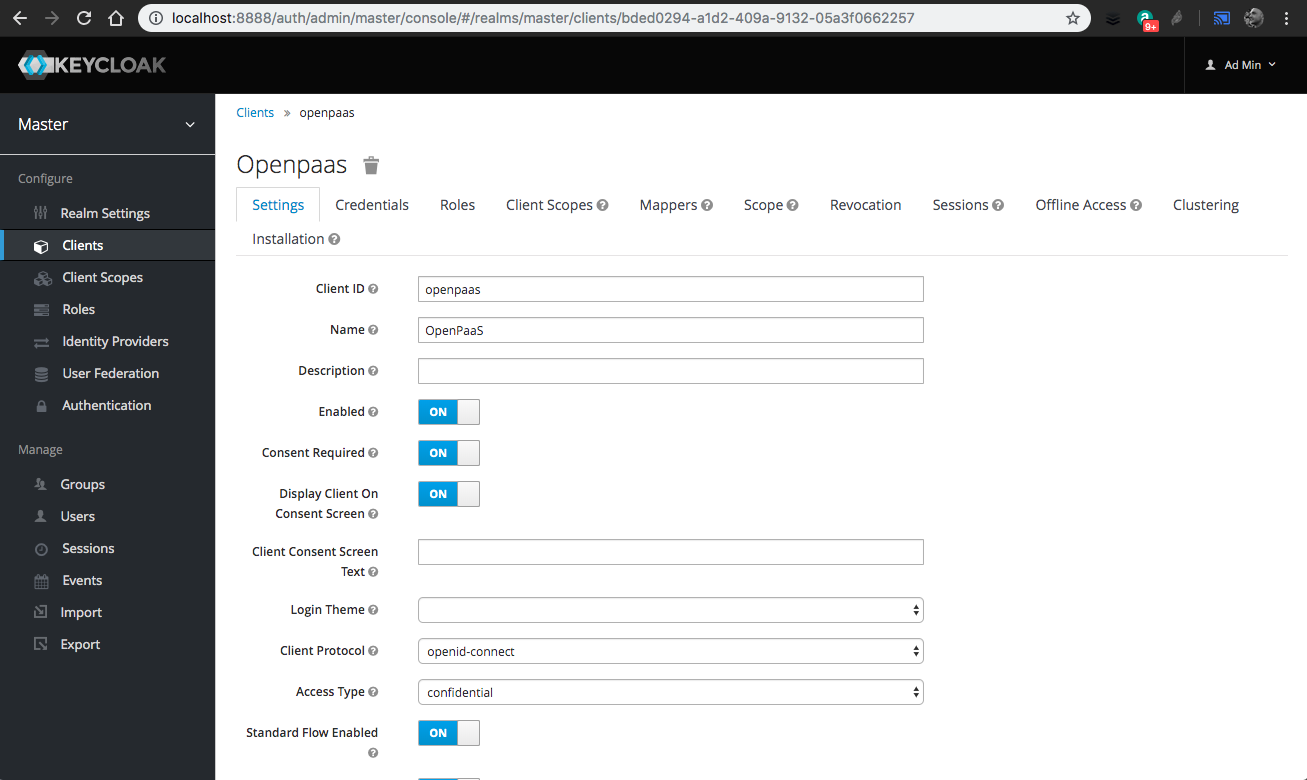
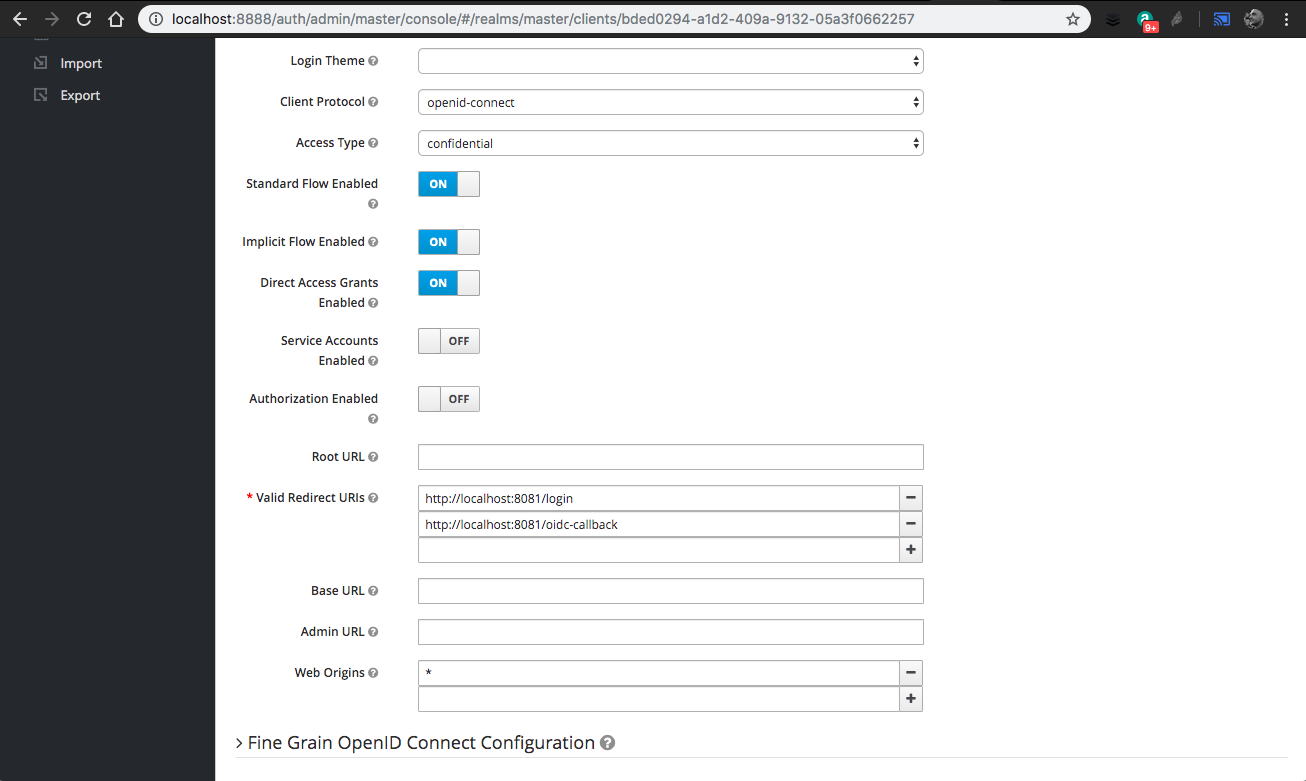
- Every time an application will have to use this OIDC client, you will have to update the
Valid redirect URIsby adding the application ones. As an example, for OpenPaaS Vue applications, you have to add 2 redirect URLs each time. If the application is running at http://localhost:8081:- http://localhost:8080/inbox/#/auth/oidc/callback
- Note: For development purposes you can define redirect URLs with wildcards like http://localhost:8080/* and http://localhost:8081/*
- You also have to add
Web originsto allow CORS based on your application deployment. For development purposes,*is enough. - Click on
Save10.You can now get theclient_secretfrom theCredentialstab: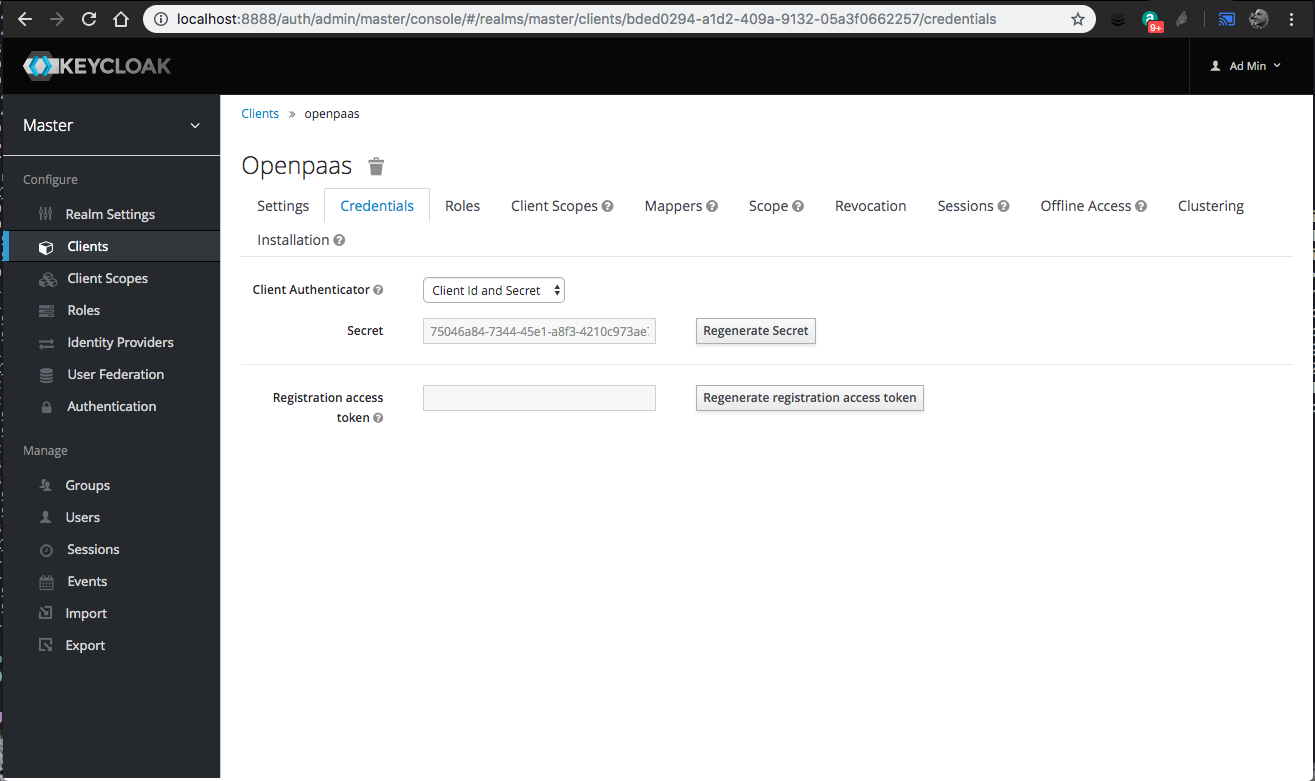
You can now configure OpenPaaS by putting the right value in platform configuration. For example, from the screenshots above, and if keycloak is running on port 8888:
{
  "name": "openid-connect",
  "value": {
    "issuer_url": "http://localhost:8888/auth/realms/master",
    "clients": [
      {
        "client_id": "openpaas",
        "client_secret": "96a97f8d-2a73-46e2-b602-512e034ea5f0",
        "authorization_url": "http://localhost:8888/auth/realms/master/protocol/openid-connect/auth",
        "token_url": "http://localhost:8888/auth/realms/master/protocol/openid-connect/token",
        "user_info_url": "http://localhost:8888/auth/realms/master/protocol/openid-connect/userinfo",
        "end_session_endpoint": "http://localhost:8888/auth/realms/master/protocol/openid-connect/logout"
      }
    ]
  }
}
In order to get user information from their access token, keycloak needs to be configured to have the same users as the ones available in OpenPaaS. Check the keycloak documentation for more information on this.
For development purposes, you can create users by hand in keycloak and use them in your daily development process:
- Go to
Users - Click on
Add user - Fill the form, be sure to put the same email as the one you have in OpenPaaS user database
- Click on
Save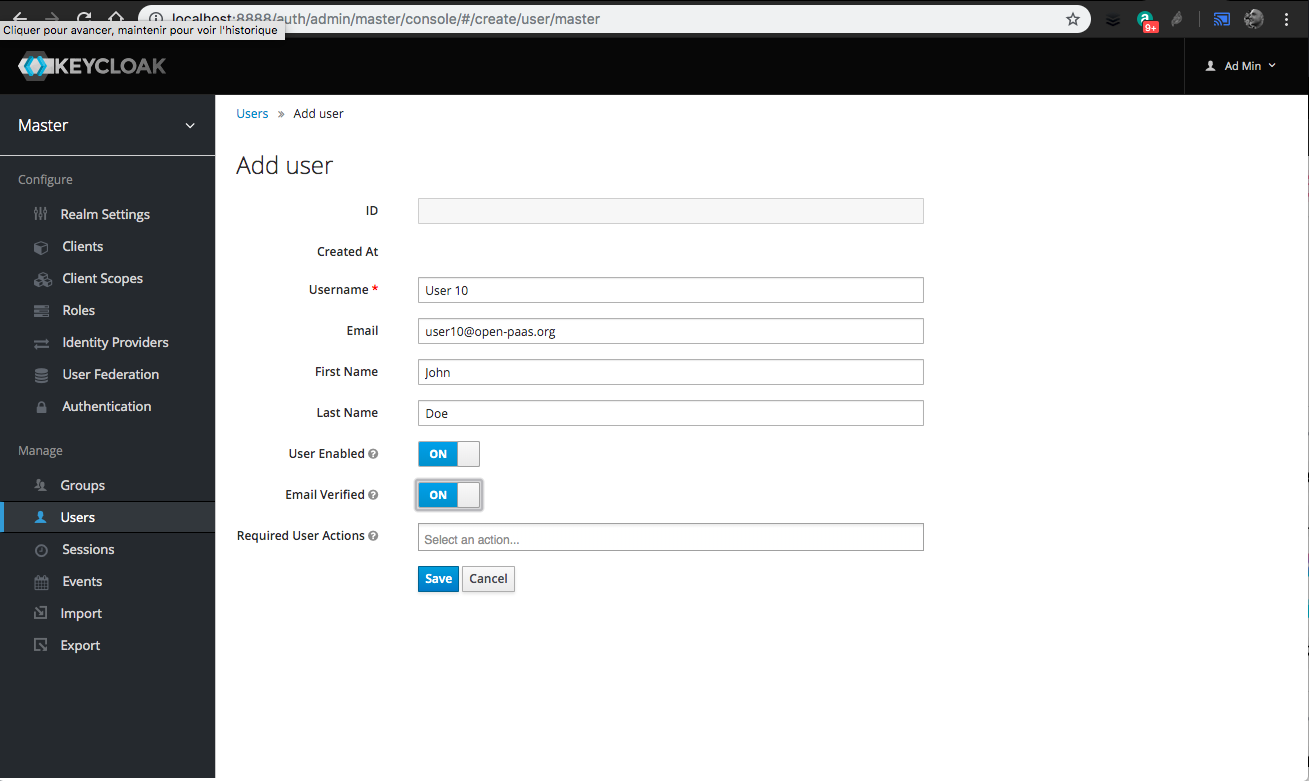
- Go in the
Credentialstab, then set aNew passwordandPassword confirmation - Toggle
TemporarytoOFF - Hit
Enterto save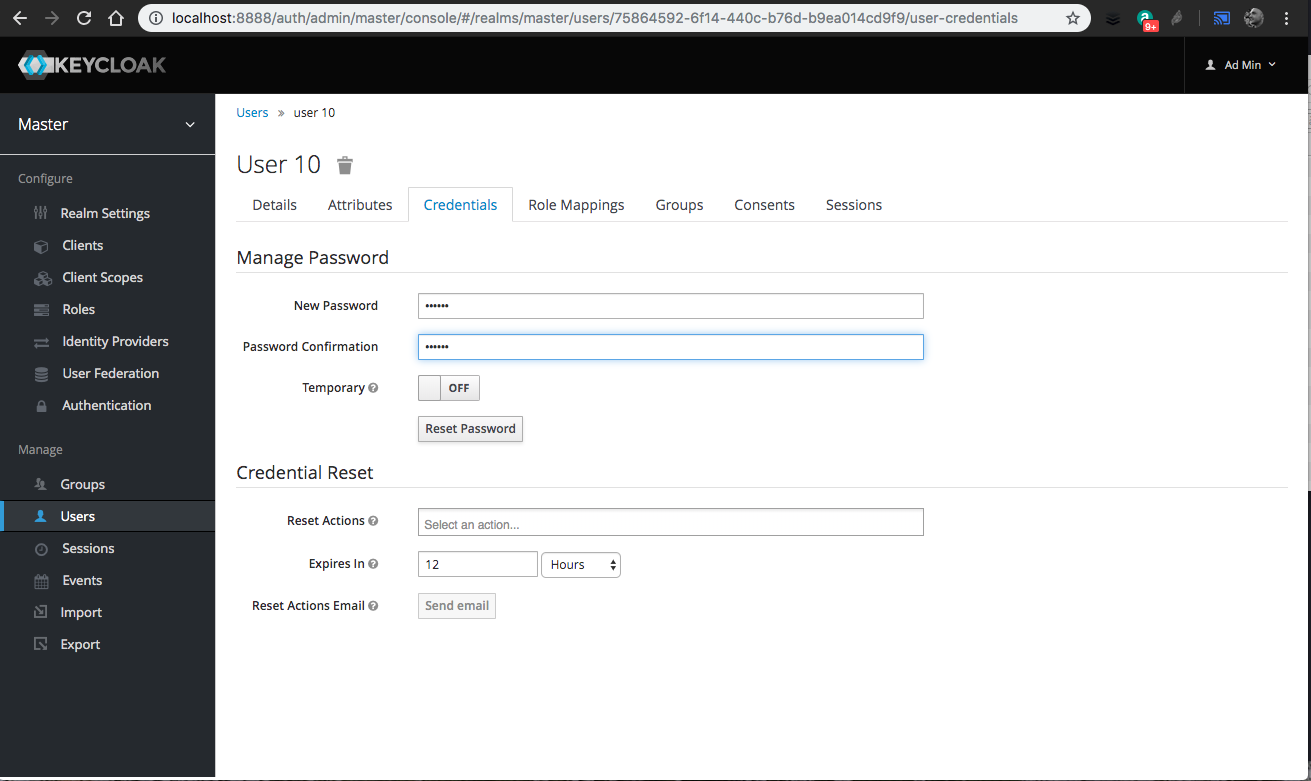
If you have a LDAP directory running somewhere in your environment, you can also use the keycloak user federation feature and import your LDAP users. Check the keycloak documentation for more details at https://www.keycloak.org/docs/6.0/server_admin/#_ldap.